Last month, I got a call from a frustrated homeowner in Arabian Ranches. He’d paid AED 38,000 for epoxy flooring in his villa just fourteen months earlier. Now the entire ground floor was peeling in sheets, bubbles were forming near the kitchen, and patches of the coating were simply lifting off when you stepped on them.
“The contractor told me this would last twenty years,” he said. “What went wrong?”
I see this story repeat itself constantly across Dubai. Not because epoxy flooring is a bad choice, it’s actually excellent when done correctly but because the gap between a proper installation and a cheap one is enormous, and most homeowners can’t tell the difference until it’s too late. This is especially true with Epoxy Floor Painting Dubai, where the final result depends heavily on preparation, materials, and experience.
After seventeen years installing, repairing, and sometimes completely redoing epoxy floors across the UAE, I’ve seen every possible failure. I’ve diagnosed bubbling in Jumeirah villas, investigated cracking in Dubai Marina apartments, and removed completely failed coatings from million-dirham properties. Many of these issues came from poorly executed Epoxy Floor Painting Dubai projects that looked fine at first but did not last.
This guide breaks down the ten most common problems with epoxy flooring in Dubai, why they happen, what they actually cost to fix, and most importantly how to prevent them from happening to you in the first place, so your Epoxy Floor Painting Dubai investment performs the way it should.
Let’s start with the biggest issue of all.
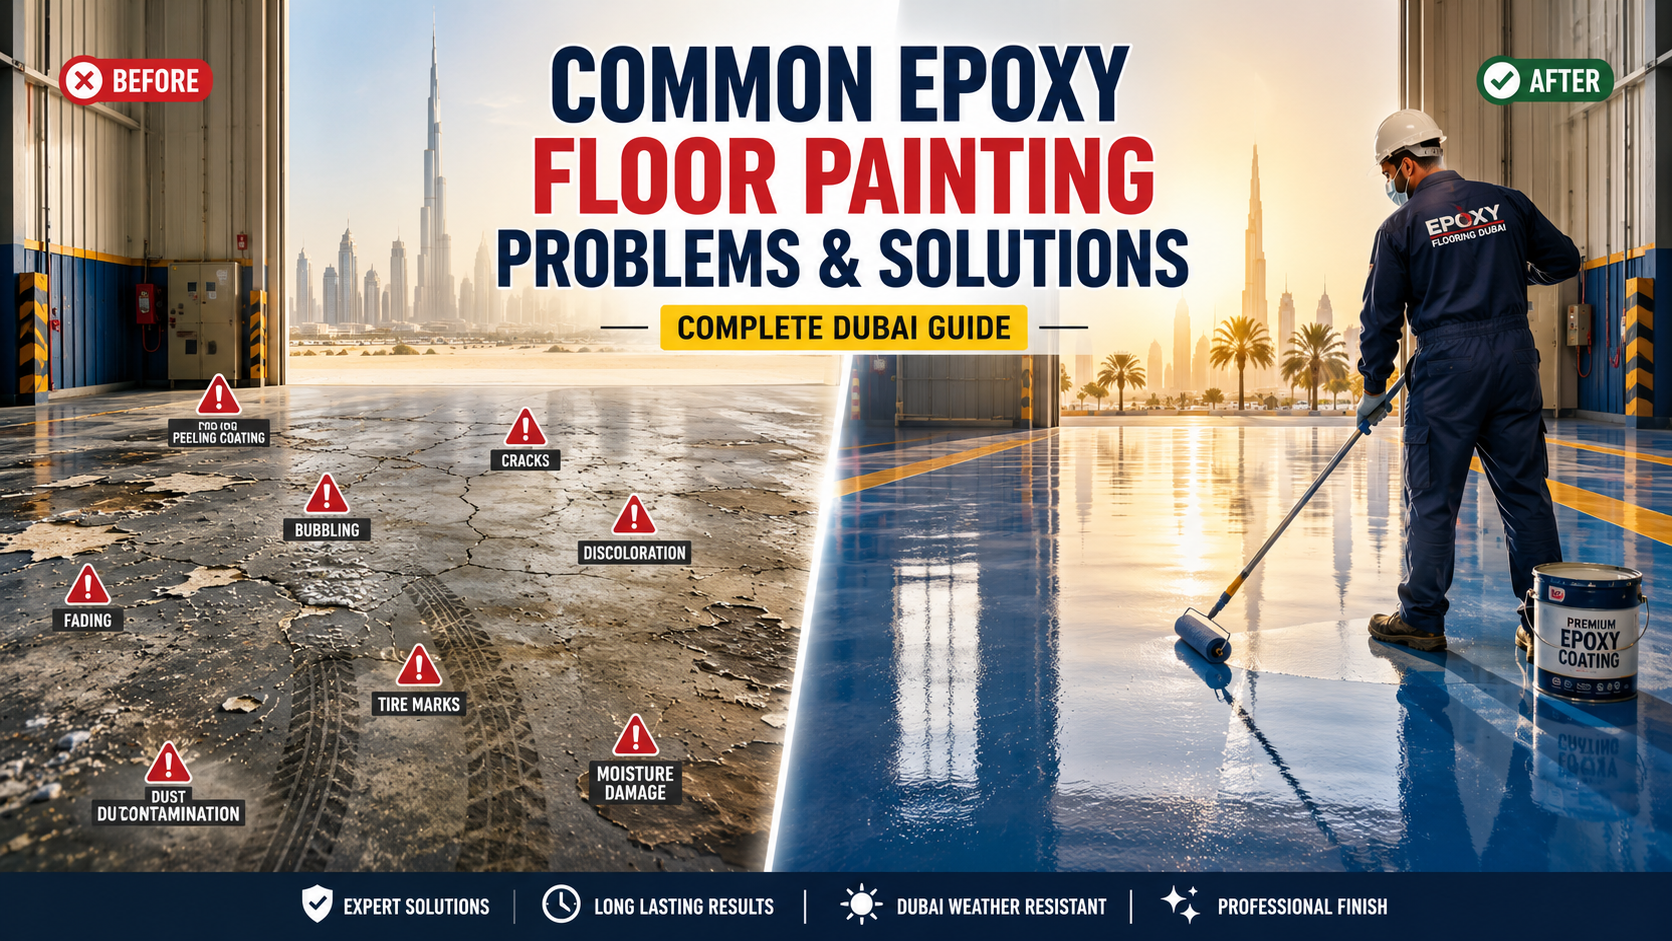
Problem 1: Poor Surface Preparation (Causes 80% of All Failures)
Here’s something most homeowners don’t know: the epoxy itself rarely fails. The concrete underneath fails. Or more accurately, the bond between the epoxy and concrete fails because the surface wasn’t prepared correctly.
I can predict with near certainty whether an epoxy floor will succeed or fail just by watching the first day of work. If I see a contractor showing up with just a hand grinder and a broom, I know that floor will be peeling within eighteen months.
What Proper Preparation Actually Involves
Professional concrete preparation for epoxy in Dubai requires specialized equipment most cheap contractors don’t own:
Diamond grinding machines that remove the top layer of concrete (called laitance), open up the pores so epoxy can penetrate, and create the proper surface profile. This equipment costs AED 15,000-40,000, which is why budget contractors skip it.
Industrial vacuum systems that extract 99% of the dust during grinding. Dubai’s fine dust is particularly problematic it’s so fine it penetrates deep into concrete pores. If not completely removed, it creates an invisible barrier between the concrete and epoxy.
Moisture testing equipment (either calcium chloride kits or relative humidity probes) that measures moisture levels in the concrete slab. Anything above 4% relative humidity, and you cannot install epoxy without first applying a moisture-blocking primer.
Crack routing tools that widen hairline cracks into V-grooves so they can be properly filled with flexible epoxy filler. Just filling the surface of a crack doesn’t work it reopens within weeks.
This preparation phase should take 1-2 full days for a typical 200 square meter residential floor. Anyone who tells you they can prep and coat in a single day is cutting corners.
The Dubai-Specific Challenge
Dubai’s construction materials add another layer of complexity. Many older villas (built 2000-2010) used concrete with high alkalinity and residual moisture that’s still present years later. Newer buildings often have polished concrete floors that look clean but are actually covered in densifier chemicals that prevent epoxy adhesion.
I recently worked on a villa in Emirates Hills where the previous contractor had simply mopped the floor and applied epoxy directly over the polished concrete. The entire coating peeled off in one continuous sheet like removing a giant sticker because it had never bonded at all.
What Poor Prep Costs You
Initial savings from skipping proper prep: AED 4,000-8,000
Cost to remove failed coating and start over: AED 15,000-25,000
Total additional cost: AED 11,000-17,000
Time lost: 3-4 weeks of disruption
How to Verify Proper Preparation
Before any epoxy is applied, you should see:
✓ The concrete surface looking rough and light gray (not smooth and dark)
✓ A consistent texture across the entire floor
✓ All cracks properly routed and filled
✓ Complete dust removal (run your hand across the surface it should come away completely clean)
✓ Documentation of moisture testing results
✓ Primer application (usually clear or milky white) that soaks into the concrete
If you don’t see these steps, stop the work immediately.
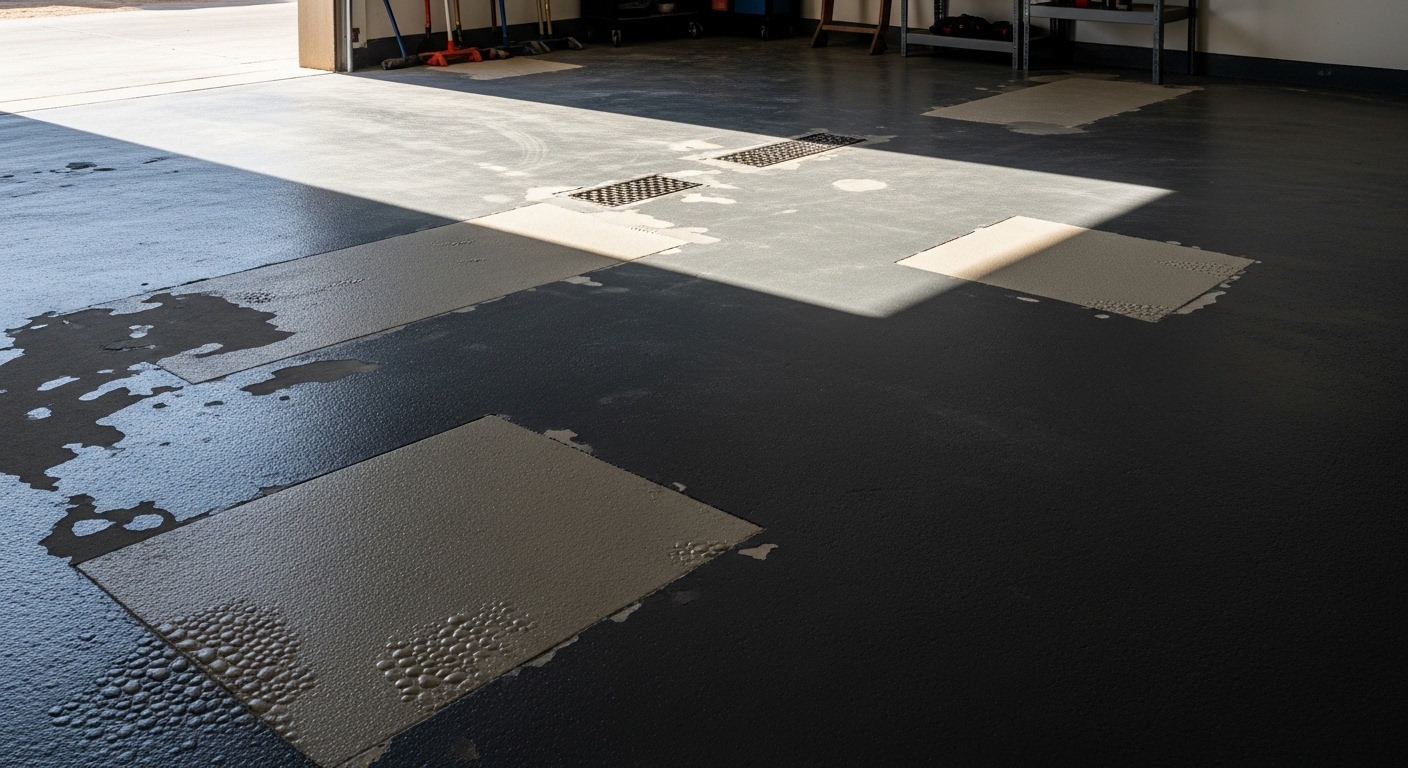
Problem 2: Moisture-Related Failures (Bubbling, Blistering, Delamination)
Walk into any Dubai villa with failed epoxy flooring, and there’s a 60% chance moisture is the culprit.
The tricky thing about moisture problems is they often don’t appear immediately. I’ve seen floors that looked perfect for six months, then suddenly developed hundreds of small bubbles across the surface seemingly overnight.
Where Moisture Comes From
In Dubai’s climate, moisture in concrete comes from several sources:
Hydrostatic pressure from groundwater pushing up through concrete slabs. This is particularly common in:
- Villas built in areas with high water tables (parts of Jumeirah, Dubai Marina)
- Ground-floor apartments in older buildings without proper waterproofing
- Any structure built before 2005 when building codes were less strict
Humidity absorption from Dubai’s coastal atmosphere. Concrete is porous and constantly absorbs and releases moisture. During summer when humidity spikes above 90% (especially July-August), concrete can absorb significant moisture even in air-conditioned spaces.
Plumbing leaks that saturate concrete slowly over time. A tiny leak you don’t notice can put enough moisture into a concrete slab to cause epoxy failure months later.
Construction moisture that never fully dried. Concrete can take 90-120 days to fully cure in ideal conditions. In Dubai’s humidity, some slabs retain moisture for years.
What Moisture Damage Looks Like
Stage 1 (Weeks 1-6): Small bubbles appear, usually starting in one area and spreading. These are moisture vapor pushing up through the coating.
Stage 2 (Weeks 6-12): Bubbles grow larger and the coating starts to soften in affected areas. Walking on it feels slightly spongy.
Stage 3 (Months 3-6): Complete delamination. The epoxy separates from the concrete in sheets. You can literally peel it off with your hands.
The Real Cost
I recently repaired a 150 square meter garage in Dubai Sports City where moisture failure had occurred:
Original installation cost: AED 18,000
Removal of failed coating: AED 6,000
Moisture mitigation system: AED 8,500
Reinstallation with moisture-blocking primer: AED 22,000
Total cost: AED 36,500
The homeowner paid twice for the same floor because the original contractor skipped a AED 800 moisture test.
Prevention Methods
Before installation:
- Demand moisture testing (calcium chloride test costs AED 500-800, but prevents AED 20,000+ in future problems)
- If moisture levels are above 4% RH, insist on moisture-blocking epoxy primer (adds AED 25-35 per square meter but is essential)
- Check for plumbing leaks in the area
- Ensure adequate curing time for new concrete (minimum 28 days, preferably 60-90)
After installation:
- Install proper dehumidification if the space is unconditioned
- Monitor for early warning signs (small bubbles, soft spots)
- Address any water intrusion immediately
Problem 3: UV Yellowing and Color Degradation
Dubai gets approximately 3,500 hours of intense sunlight per year. Standard epoxy coatings were not designed for this level of UV exposure.
I recently inspected a beautiful outdoor patio in Palm Jumeirah where the homeowner had spent AED 45,000 on a stunning metallic epoxy finish. After just eight months, the entire surface had turned a sickly yellow-brown color. The structural integrity was fine, but the aesthetic result was ruined.
Why Epoxy Yellows
Standard epoxy resins are based on aromatic chemistry. When UV light hits these molecular structures, they undergo a process called photo-oxidation that causes yellowing. This happens faster in:
- Direct sunlight areas (patios, driveways, balconies)
- Rooms with large windows and southern exposure
- Garages with open doors during the day
- Any uncovered outdoor application
The yellowing typically starts within 3-6 months of UV exposure and progresses over time. Light colors show it most dramatically a crisp white epoxy can turn amber within a year.
The Indoor Problem
Even indoor floors can yellow if they’re near windows. I’ve seen living room epoxy floors that looked perfect in most of the room but had distinct yellow rectangles where sunlight streamed through floor-to-ceiling windows.
The Solution: Aliphatic Polyurethane Topcoats
UV-resistant topcoats use aliphatic chemistry instead of aromatic. These coatings don’t yellow under UV exposure and actually protect the epoxy base layer underneath.
Cost comparison:
- Standard epoxy-only system: AED 90-120/sqm
- Epoxy with aliphatic UV topcoat: AED 115-150/sqm
- Additional cost: AED 25-30/sqm
- Value: Prevents complete color failure
For outdoor applications in Dubai, the UV-stable topcoat isn’t optional it’s mandatory. Any contractor who doesn’t mention it for an outdoor project either doesn’t know what they’re doing or is cutting corners to win the bid.
Can Yellowed Epoxy Be Fixed?
Sort of. You can apply a UV topcoat over yellowed epoxy, which stops further degradation and slightly improves the appearance. But it won’t reverse the yellowing that’s already occurred.
Your options are:
- Live with it (free, obviously unsatisfying)
- Apply UV topcoat to prevent worsening (AED 35-45/sqm)
- Lightly sand and recoat (AED 60-80/sqm, moderate improvement)
- Complete removal and reinstallation (AED 90-140/sqm)
Prevention is far cheaper than correction.
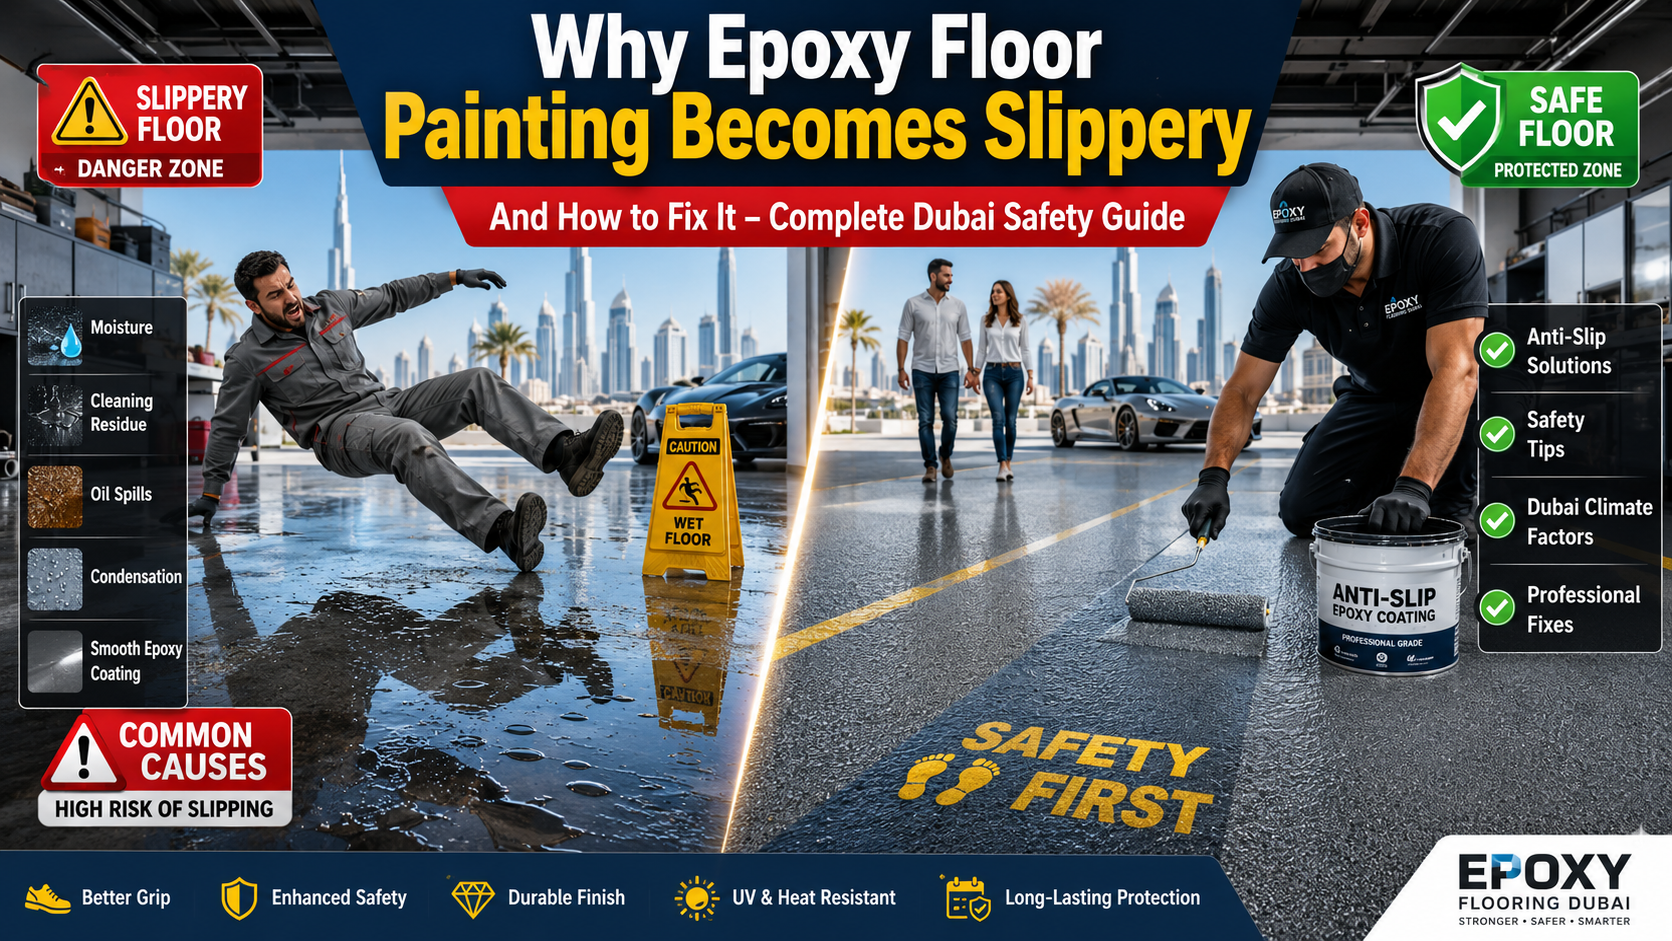
Problem 4: Slippery Surfaces (Safety Hazard)
Glossy epoxy floors look stunning in photos. They’re also dangerously slippery when wet, which is a serious problem in several common applications.
I witnessed a nasty fall in a villa kitchen where the homeowner had installed high-gloss epoxy. She stepped on the floor with slightly wet feet from the pool area and her legs went out from under her instantly. Fractured wrist, three months of recovery.
Where Slip Resistance Matters Most
Critical areas:
- Bathrooms and powder rooms
- Kitchen floors
- Outdoor patios and pool decks
- Garages where water might be present
- Commercial spaces (retail stores, restaurants, gyms)
- Any elderly or child-occupied space
Lower risk areas:
- Bedrooms
- Offices
- Enclosed, climate-controlled areas
- Spaces where water never appears
The Science of Slip Resistance
Slip resistance is measured by COF (Coefficient of Friction). Higher numbers = better grip.
- Glossy epoxy when wet: COF 0.2-0.3 (extremely slippery)
- Matte epoxy when wet: COF 0.4-0.5 (still marginal)
- Epoxy with anti-slip aggregate: COF 0.6-0.8 (safe)
- Heavily textured epoxy: COF 0.9+ (very safe, possibly too rough)
Dubai Municipality actually has building codes requiring minimum COF values for commercial applications, but residential installations often skip this consideration entirely.
Anti-Slip Solutions
Aluminum oxide aggregate: Fine particles broadcast into the final coat create a subtle sandpaper-like texture. This is my most common recommendation.
- Appearance: Slightly dulls the shine but still looks professional
- Feel: Noticeable texture but not rough
- Cost: +AED 15-25/sqm
- Effectiveness: Excellent
Silica sand: Coarser texture for industrial or outdoor use.
- Appearance: Very matte, textured surface
- Feel: Rough underfoot
- Cost: +AED 10-20/sqm
- Effectiveness: Excellent, possibly excessive for homes
Non-slip additives mixed into coating: Creates microscopic texture.
- Appearance: Maintains most of the gloss
- Feel: Barely noticeable
- Cost: +AED 8-15/sqm
- Effectiveness: Moderate (better than nothing, not as good as aggregate)
Shark Grip or similar polymer products: Clear anti-slip coating applied over epoxy.
- Appearance: Doesn’t significantly change look
- Feel: Enhanced grip without roughness
- Cost: +AED 30-45/sqm
- Effectiveness: Very good
Don’t Skip This
I’ve done retrofit anti-slip applications on dozens of floors after slip incidents. It’s always more expensive than doing it right the first time, and you can never quite match the original finish perfectly.
Initial anti-slip addition: AED 15-25/sqm
Retrofit anti-slip after installation: AED 40-60/sqm
Medical costs from a serious fall: AED 5,000-50,000+
Add the anti-slip treatment. Always.
Problem 5: Cracking Due to Substrate Movement
Here’s a hard truth: epoxy is only as stable as the concrete underneath it. If the concrete cracks, the epoxy cracks. If the concrete shifts, the epoxy fails.
Dubai’s extreme temperature cycling creates particular challenges. Concrete expands in heat and contracts in cooler conditions. Over months and years, this movement stresses both the concrete and anything bonded to it.
Common Crack Patterns
Thermal stress cracks: Usually appear in outdoor or unconditioned spaces. You’ll see straight-line cracks following the path of least resistance through the slab.
Settlement cracks: Diagonal cracks running from corners or edges, caused by the building settling slightly (normal in Dubai’s sandy soil conditions).
Structural cracks: Often wider and deeper, these indicate actual problems with the building’s foundation. If you see these, you have bigger issues than your flooring.
Control joint reflection: Concrete slabs have intentional joints cut into them to control where cracking occurs. If epoxy is applied too thick or rigid, these joints eventually “telegraph” through as visible lines.
When Cracking Appears
Most thermal cracking shows up within the first 12-18 months after installation, as the floor goes through its first full annual temperature cycle.
I inspected a garage in Mirdif where fine cracks appeared in a grid pattern after the first summer. The concrete underneath had developed hairline cracks from thermal stress that the epoxy was now following. The homeowner thought the epoxy was failing actually, it was perfectly bonded and simply reflecting what was happening in the substrate.
Prevention Strategies
Flexible crack filling: Before epoxy application, all existing cracks should be filled with flexible polyurea or urethane filler that can accommodate movement.
Proper joint treatment: Expansion joints and control joints should either be maintained (leaving them as designed gaps) or filled with flexible materials, never rigid epoxy.
Appropriate epoxy systems: In areas with significant temperature variation, use slightly flexible epoxy formulations rather than rigid 100% solids types.
Realistic expectations: In unconditioned garages or outdoor areas, some minor cracking over years is normal. This is concrete behavior, not epoxy failure.
Repair Options
Cosmetic hairline cracks: Can often be filled with color-matched epoxy paste and recoated.
- Cost: AED 50-80 per linear meter
- Result: 80-90% invisible when done well
Structural cracks: Require injection with flexible polyurethane, then surface repair.
- Cost: AED 150-250 per linear meter
- Result: Crack is stabilized and cosmetically improved
Extensive cracking: May require complete coating removal, concrete repair, and reinstallation.
- Cost: AED 80-120/sqm for full area
- Result: Like-new appearance
Problem 6: Coating Thickness Issues (Too Thin or Uneven)
Most homeowners have no idea how thick epoxy flooring should actually be. This knowledge gap lets unscrupulous contractors stretch materials to cover more area than they should, resulting in thin, weak coatings that fail prematurely.
Standard residential epoxy systems should be:
- Primer coat: 150-200 microns (about the thickness of two sheets of paper)
- Base coat: 300-500 microns
- Topcoat: 100-150 microns
- Total system: 550-850 microns (0.55-0.85mm)
Industrial or garage applications often go thicker: 2-5mm total system thickness.
The Thin Coating Problem
I recently tested a failed installation in Business Bay where the entire coating measured just 180 microns total less than half of what it should have been. The contractor had diluted the epoxy with solvent (which weakens it) to make it spread further.
Thin coatings fail because:
- They don’t fully hide substrate imperfections
- They wear through quickly in traffic areas
- They’re more prone to scratching and damage
- They can’t bridge small cracks
- They don’t provide adequate protection
The Uneven Coating Problem
When applied by inexperienced installers, epoxy thickness varies dramatically across the floor. You end up with:
- Thick areas that look great
- Thin areas that wear through quickly
- Visible roller marks and application lines
- Inconsistent color and shine
I inspected a villa in Victory Heights where you could literally see the path the installer had walked thick coating where he’d started each section, thin coating as he worked his way across.
How to Verify Proper Thickness
Before installation:
- Confirm the coverage rate in the contract (should be 5-7 sqm per liter for 200-300 micron coats, less for thicker applications)
- Verify the total quantity of material to be used
- Ask for the technical data sheet showing recommended coverage
During installation:
- Material should look thick and syrupy, not thin and runny
- Contractor should use notched squeegees or gauge rakes (not just rollers)
- You should see substantial material going onto the floor
After installation:
- Professional installers can measure thickness with ultrasonic gauges (service costs AED 500-800 but proves compliance)
- Visual inspection: the coating should completely hide the concrete texture
Problem 7: Chemical Exposure and Staining
Dubai garages see specific chemical challenges: motor oil, brake fluid, tire marks from hot asphalt-covered tires, and acidic car wash runoff.
Standard residential epoxy has decent chemical resistance, but it’s not impervious. I’ve seen garage floors badly stained by:
Motor oil left overnight: Creates dark stains that penetrate if not cleaned within 24 hours
Battery acid: Eats right through the topcoat and into the epoxy base if not cleaned immediately
Tire plasticizers: Hot tires can leave permanent brown marks on some epoxy formulations
Rust: Metal furniture or equipment can leave rust stains that are nearly impossible to remove
Chemical Resistance Hierarchy
Different epoxy types offer different protection:
Water-based epoxy: Poor chemical resistance. Not recommended for garages.
Standard solvent-based epoxy: Moderate resistance. Handles brief exposure but can stain with prolonged contact.
100% solids epoxy: Good resistance. Handles most automotive chemicals if cleaned within 24 hours.
Polyaspartic or polyurea topcoats: Excellent resistance. Nearly stain-proof.
Real-World Testing
I conducted my own informal tests:
- Motor oil left for 48 hours on standard epoxy: Permanent shadow stain
- Same test on polyaspartic topcoat: Wiped clean completely
- Battery acid on standard epoxy: Dulled finish, slight etching
- Battery acid on polyaspartic: No visible effect
For garage applications where chemical exposure is likely, spend the extra AED 30-40/sqm for a chemical-resistant topcoat. It’s insurance against permanent damage.
Problem 8: Color Inconsistency and Aesthetic Issues
This is less about structural failure and more about getting what you paid for visually.
I’ve mediated disputes where homeowners expected one appearance and got something completely different:
Metallic epoxy that looks nothing like the sample: Metallic effects are extremely skill-dependent. The installer’s technique dramatically affects the final pattern. I’ve seen metallic floors that looked stunning in a showroom sample but turned out blotchy and uneven in the actual installation.
Color variations across the floor: This happens when:
- Multiple batches of epoxy are mixed slightly differently
- Installation takes multiple days with different environmental conditions
- Substrate absorption varies (darker in areas where concrete was more porous)
Visible seams and overlap marks: Should never be visible in a professional installation but commonly appear in cheap jobs.
Decorative flake distribution problems: Too sparse in some areas, too dense in others. Should be broadcast evenly at 100% coverage or specific partial coverage rates.
How to Prevent Aesthetic Disappointments
- See actual installed floors, not just samples: Ask your contractor for addresses of recent similar projects you can visit.
- Understand that samples are idealized: The sample chip is made under perfect conditions. Your floor will vary somewhat.
- Get color and finish specifications in writing: “Metallic silver with high gloss” is vague. “Leggari Silver Bullet metallic effect with 85+ gloss units” is specific.
- Confirm the installer’s experience with decorative effects: Solid color epoxy is relatively forgiving. Metallics, flakes, and special effects require significant skill.
- Budget appropriately: Beautiful decorative epoxy floors cost AED 150-250/sqm installed. If someone quotes AED 80/sqm for metallic epoxy, you won’t get the result you’re imagining.
Problem 9: Installation Timing and Curing Issues
Epoxy is temperature and humidity sensitive during application and curing. Dubai’s climate creates specific challenges.
The Summer Installation Problem
Floor surface temperatures in unconditioned Dubai garages can hit 50-60°C during summer afternoons. At these temperatures:
- Epoxy cures too fast (sometimes in minutes instead of hours)
- Installers can’t spread it properly before it starts to gel
- Bubbles form as the material outgasses rapidly
- Surface finish is rough and uneven
I refuse to install garage epoxy during July-August unless the space can be climate controlled. The failure rate is simply too high.
The Humidity Problem
High humidity during installation can cause:
- Surface blush (milky or cloudy appearance)
- Amine blush (greasy film on the surface)
- Extended cure times (taking days instead of hours)
- Reduced adhesion
Dubai’s humidity typically spikes July-September, especially at night. Morning installations during these months often encounter 80-90% humidity.
Optimal Installation Windows
Best months for epoxy installation in Dubai:
- November through March (cooler, lower humidity)
- Surface temperatures: 15-30°C
- Humidity: 40-65%
- Cure times predictable
Challenging but manageable:
- April, May, October (warm but not extreme)
- Requires careful timing and possible climate control
Avoid if possible:
- June through September (extreme heat and humidity)
- Only install in climate-controlled spaces during these months
What Happens When Curing Goes Wrong
Too-fast cure:
- Visible lap marks and roller lines
- Uneven surface texture
- Poor adhesion
- Brittle coating that cracks easily
Too-slow cure:
- Surface stays tacky for days
- Dust and debris stick to the surface
- Soft coating that never reaches full hardness
- Possible delamination later
Cost to fix improperly cured epoxy: Complete removal and reinstallation (AED 80-120/sqm)
Problem 10: Poor Contractor Selection (The Root of Most Problems)
After seventeen years in this industry, I can tell you that roughly 60-70% of epoxy flooring problems in Dubai trace back to one simple issue: the homeowner hired the wrong contractor.
This isn’t about insulting anyone it’s about recognizing that the flooring industry in Dubai has virtually no barriers to entry. Anyone with a truck and some materials can call themselves an epoxy flooring contractor.
The Lowball Quote Trap
I see this pattern constantly:
Homeowner gets three quotes:
- Company A: AED 140/sqm (experienced, licensed, insured)
- Company B: AED 95/sqm (moderate experience)
- Company C: AED 60/sqm (new company, great price!)
Homeowner thinks: “It’s all the same epoxy, right? Why pay double?”
Reality: Company C will:
- Use inferior materials
- Skip proper surface preparation
- Apply coating too thin
- Have no insurance if something goes wrong
- Disappear when problems appear
- Provide no meaningful warranty
Six months later, the floor is failing and Company C’s phone is disconnected.
Red Flags to Watch For
Immediate warning signs:
No physical office or showroom: Just a mobile number and email
Can’t provide recent client references: Or provides obviously fake ones
Vague about materials: “We use good quality epoxy” without specifying brands or products
Pressure tactics: “This price is only good today”
No written contract: Or contract with minimal detail
Cash-only payment: Legitimate businesses accept traceable payment
No insurance documentation: Can’t provide liability insurance certificate
Extremely fast timeline: “We can start tomorrow and finish in two days”
Price dramatically lower than others: Usually 40%+ below market rate
Green Flags (Good Signs)
Established physical location you can visit
Portfolio of completed projects with verifiable addresses
Specific material specifications with technical data sheets
Detailed written proposal breaking down all costs
Licensed by Dubai Municipality with verifiable license number
Comprehensive insurance (copies provided)
Realistic timeline (5-7 days minimum for 200 sqm residential)
Competitive but not suspiciously low pricing Written warranty (minimum 2 years on labor, 5-10 on materials)
References you can actually contact (and they answer)
The True Cost of Hiring Wrong
Case study from my own project files:
A client hired a budget contractor for AED 18,000 to coat a 200 sqm garage. The floor failed completely within 8 months.
Costs:
- Original installation: AED 18,000
- My consultation and testing: AED 1,200
- Removal of failed coating: AED 8,000
- Proper reinstallation: AED 28,000
- Total spent: AED 55,200
If he’d hired a reputable company initially for AED 28,000, he would have saved AED 27,200 and months of frustration.
How to Actually Avoid These Problems
After covering ten major problem areas, here’s your action plan:
Before You Hire Anyone:
Step 1: Educate Yourself (You’re Doing This Now)
- Understand what proper installation involves
- Know the right questions to ask
- Recognize warning signs
Step 2: Get Multiple Detailed Quotes
- Minimum three quotes
- Each should specify materials, process, timeline
- Compare details, not just price
Step 3: Verify Credentials
- Check Dubai Municipality licensing
- Confirm insurance coverage
- Visit their office/showroom if possible
- See actual completed projects
Step 4: Call References
- Speak to at least three previous clients
- Ask about problems that arose and how they were handled
- Visit installed floors if possible (1+ years old preferred)
During the Contract Phase:
Step 5: Get Everything in Writing
- Specific material brands and product names
- Detailed surface preparation process
- Timeline with milestones
- Payment schedule (never pay everything upfront)
- Warranty terms and coverage
- What happens if problems arise
Step 6: Understand the Timeline
- Realistic for quality work: 5-7 days minimum
- Account for curing time
- Plan for disruption
- Don’t accept rushed schedules
During Installation:
Step 7: Verify Proper Process
- Surface preparation should take 1-2 days
- Moisture testing should be documented
- Materials should match contract specifications
- Installation shouldn’t be rushed
Step 8: Document Everything
- Take photos at each stage
- Keep all receipts and paperwork
- Note any deviations from contract
- Communicate concerns immediately
After Installation:
Step 9: Proper Curing
- Follow all cure time recommendations
- Don’t rush to use the floor
- Maintain proper temperature and humidity
- Keep the space clean during curing
Step 10: Maintenance and Monitoring
- Follow recommended cleaning procedures
- Watch for early warning signs of problems
- Address any issues immediately
- Maintain warranty compliance
The Questions You Should Ask Every Contractor
Copy this list and use it during contractor interviews:
About Experience:
- How many years have you been installing epoxy in Dubai specifically?
- How many projects similar to mine have you completed?
- Can I visit 3-5 recently completed projects?
About Process: 4. Exactly what surface preparation will you do? 5. What equipment will you use for preparation? 6. Will you test for moisture? How? 7. What happens if moisture levels are too high?
About Materials: 8. What brand and specific product will you use? 9. Can I see the technical data sheet? 10. Is it 100% solids, solvent-based, or water-based? 11. What topcoat will you apply? 12. Is the topcoat UV-resistant? (Essential for outdoor/sunlit areas) 13. Will you add anti-slip treatment? (Essential for wet-prone areas)
About Timeline: 14. How long will the entire process take? 15. What are the curing times before I can walk/drive on it? 16. When will it reach full hardness?
About Warranty: 17. What exactly does your warranty cover? 18. How long is the warranty period? 19. What voids the warranty? 20. If problems occur, what’s your response process?
About Business: 21. Are you licensed by Dubai Municipality? (Get license number) 22. Do you have liability insurance? (Get certificate) 23. What’s your company’s physical address? 24. Can I get references with contact information?
About Cost: 25. What’s included in your quote? 26. What’s NOT included? 27. What’s your payment schedule? 28. Are there any potential additional costs?
Any contractor who can’t or won’t answer these questions thoroughly should be eliminated from consideration.
When to Walk Away
Some situations aren’t worth the risk:
Absolute deal-breakers:
- Contractor refuses to provide references
- Can’t show valid Dubai Municipality license
- Won’t specify materials in writing
- Demands full payment upfront
- Provides no warranty or only 30-90 days
- Quote is 50%+ below others with no explanation
- Can’t explain their preparation process
- Pressure tactics or aggressive sales approach
- No physical business location
- Negative reviews mentioning similar problems repeatedly
Trust your instincts. If something feels wrong, it probably is.
The Reality Check
Quality epoxy flooring installation in Dubai costs AED 110-180 per square meter for residential applications, depending on:
- Type of epoxy system
- Surface condition and prep requirements
- Decorative elements (solid color vs. flakes vs. metallic)
- Area size (larger areas have economies of scale)
- Accessibility and logistics
For a typical 200 sqm villa ground floor:
- Budget option (water-based, minimal prep): AED 18,000-22,000
- Standard quality (solvent-based, proper prep): AED 24,000-32,000
- Premium (100% solids, decorative, UV topcoat): AED 32,000-42,000
For a 40 sqm garage:
- Budget: AED 4,000-5,500
- Standard: AED 5,500-7,200
- Premium: AED 7,200-9,500
If someone quotes significantly below these ranges, they’re cutting corners somewhere. The question is whether you’ll discover where until after they’re gone and your floor is failing.
Final Thoughts
I started this guide talking about the homeowner in Arabian Ranches whose AED 38,000 floor failed in fourteen months. We ended up completely removing that coating, fixing multiple preparation issues the original contractor had ignored, and reinstalling with proper materials and process.
Total cost to fix: AED 31,000 on top of the original AED 38,000 he’d already spent.
He told me afterward: “I wish I’d read something like this before hiring the first contractor. I would have recognized all the red flags.”
That’s why I wrote this guide.
Epoxy flooring is an excellent choice for Dubai homes when done correctly. It handles the heat, resists the dust, provides decades of service, and looks outstanding. I’ve installed systems that are now fifteen years old and still performing beautifully.
But the gap between a proper installation and a cheap one is enormous and expensive to fix.
The problems I’ve described in this guide are all preventable. Not by using different materials or magic solutions, but by hiring competent contractors who know what they’re doing and actually do the work properly.
Yes, that costs more upfront. But when you consider that a quality installation lasts 15-20+ years while a cheap one fails in 1-2 years, the math is pretty clear.
Your floor is one of the largest surface areas in your home. You walk on it every day. It’s worth getting right the first time.
Do your research. Ask the tough questions. Verify credentials. Check references. Don’t chase the lowest price. And if something seems too good to be true, it absolutely is.
Get it right once, and you’ll enjoy beautiful, durable flooring for decades. Get it wrong, and you’ll be reading guides like this while getting quotes to fix someone else’s mistakes.